Create feature
This page describes all the functions for creating and deleting features and stamps.
Select
This is the main function for creating features.
There are three ways to activate the “Select” function in infra-CONVERT:
- via the Select icon
- via Select feature in the Features menu
- via the S key
Tip: This functionality depends on whether a drawing, or pdf/graphic has been uploaded a drawing file!
For more information on drawing formats see: ⇒ Supported drawing formats
Drawings
Creating features for drawings is done in two steps:
- Move the mouse to dimension for which you want to create a feature.
The software highlights recognized dimensions.
Click the left mouse button over the dimension. A dialogue window appears:
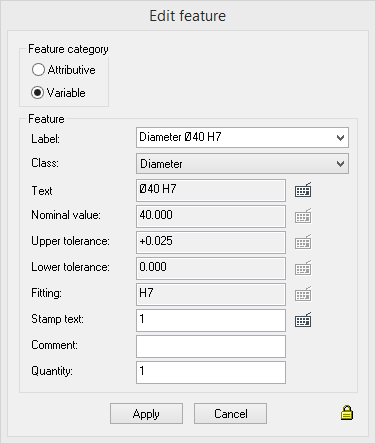
- Quantity 1): How many times should the feature appear in the quality control plan.
- After clicking Apply the stamp can be positioned on the drawing.
infra-CONVERT software automatically adopts all the properties attributed to the dimension, e.g. the General tolerances and Norm tolerances. If you do not want to accept the adopted values you can change these manually. Click to unlock on the padlock symbol in the lower right corner.
Tip: If infra-CONVERT fails to recognize a dimension, check Permit all elements in the Features menu to see if the filter is set correctly.
PDFs and graphics
With pdfs and graphics files double click on Add feature function. The stamp is automatically added at the point of the double click.
Select area
This function creates all the features in a specified drawing area.
There are three ways to activate the “Select area” function in infra-CONVERT:
- via the Select area icon
- via Select area in the Features menu
- with the M key
The area is selected in two steps:
- Move the mouse to one of the corners of the area you want to stamp, press and hold down the left mouse button.
- Drag the mouse to the diagonally opposite corner of the area you want to stamp and release the left mouse button.
All dimensions recognized in this defined area are added to the features table.
Tip: This function is only available for files in Drawing formats.
Select all features
This function creates all the features in a complete drawing area.
There are two ways to active the “Search all features ” in infra-CONVERT:
- via the Select all features icon
- via Select all features in the Features menu
infra-CONVERT searches the complete drawing for dimensions and creates the corresponding features.
Tip: This function is only available for Drawing formats.
Add feature
This function creates a feature.
There are two ways to activate the “Add feature” function in infra-CONVERT:
- via the Add feature icon
- via Add feature in the Features menu.
Features are created in four steps:
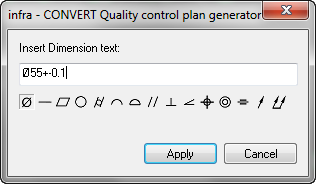
- A window appears when the function is activated in which data about the feature can be entered in short form. Icons, directly below the entry bar, are available for entering information on form and positional tolerances:
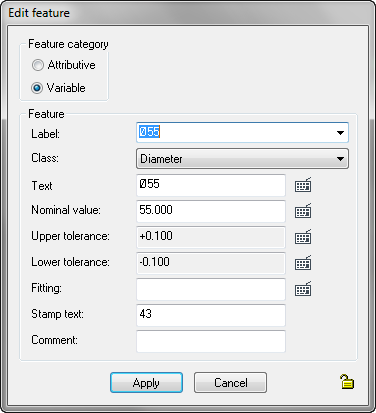
- Information entered about the feature is analyzed and displayed for inspection in a features dialogue:
- After the information has been successfully entered, the stamp is set in place and parked with a click on the left mouse button.
- The stamp is then orientated and the procedure completed with a left mouse button click.
Tip on short form entries
- Feature information can be entered has is appears on the drawing.
- If text begins with a “d” or “D” (followed by a number) this is inserted as the diameter symbol.
- For symmetrical tolerances a combination with +- can be entered.
- Example
- D74.2 +-0.05
- D74.2 +0.1 -0.3
- D74 H7
- R2.5
- Rz25
- 45°
Add attributive feature
This function creates an attributive feature.
There are two ways to activate the “Add attributive function” in infra-CONVERT:
- via the Add attributive feature icon
- via Add attributive feature in the Features menu.
Attributive features are added in four steps:
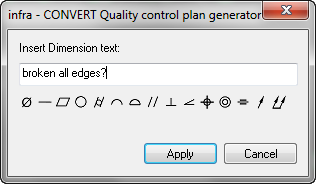
- A window appears when the function is activated in which data about the feature can be entered in short form:
- Information entered about the feature is analyzed and displayed for inspection in a features dialogue:
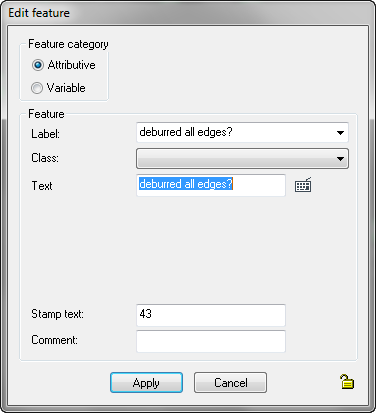
- After the information has been successfully entered, the stamp is set in place and parked with a click on the left mouse button.
- The stamp is then orientated and the procedure completed with a left mouse button click.
Delete feature
This function is used to delete features.
There are two ways to activate the “Delete feature” function in infra-CONVERT:
- via the Delete feature icon
- via Delete feature in the Features menu.
When this function is active, every feature you click is irreversibly deleted, with no safety message asking you to confirm you want to delete the feature in question.
Tip: The mouse changes its appearance when the delete function is active: 
Adjust stamp text
Stamp texts can be adjusted individually. To do this click on the icon behind “Stamp text”.
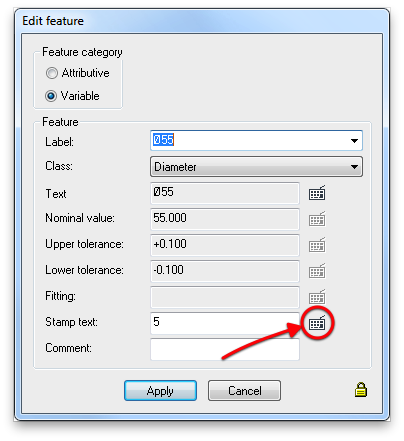
You can adjust the stamp texts for the whole drawing in the appering dialog window:
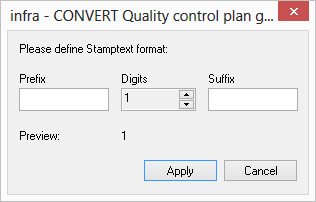
- Prefix: Defines the character(s) to add before the stamp number.
- Digits: How many digits the stamp number should have.
- Suffix: Defines the character(s) to add behind the stamp number.