Feature table
There are two ways to display the Features table in infra-CONVERT:
- via the Show feature table icon
- via Display feature table... in the Extras menu
The “Feature table” opens:

This window lies on top of all other windows open in the user interface. If you want to close this window for ease of working, simply click the cross in the top right-hand corner. You do not lose any data when closing the window.
Sort data:
Data can be sorted by clicking on column headings (Stamp text, Text, Nominal value, UT, LT, Description and Class), for instance assigning new stamp numbers to all features included in the diameter class. Sorting does not change the data itself but only the sequence of existing data sets.
Select data:
As in other Windows programmes, it is also possible to select data sets within the Feature table. Left-click the cell(s) containing the feature(s) you want (the active cells are highlighted). Multiple features can be selected by left-clicking the mouse and holding down the either the CRTL or SHIFT key:

Selecting features in the Feature table also highlights them in the infra-CONVERT Drawing area and vice versa.
Tip: infra-CONVERT provides a number of functions for selecting all the features of a view. For more information see ⇒ Functions: Select stamp
Feature table functions
The Feature table has a row of icons above the data sets. Left-clicking one of these icons activates the corresponding function.
Moving a feature one row
 Clicking on the up / down arrows moves a single feature one row at a time in the table. This only changes the feature's position in the table.
Edit feature
![]() Click this icon to edit a single feature.
Click this icon to edit a single feature.
Delete a feature
![]() All selected features are deleted when this icon is clicked. This functions deletes the feature from the table along with its corresponding stamp on the drawing.
All selected features are deleted when this icon is clicked. This functions deletes the feature from the table along with its corresponding stamp on the drawing.
Assign to drawing area
![]() This assigns selected features to the current view. This function is used to create graphics for export. The view can be changed via Mouse or View functions and then assigned the features selected via this icon.
This assigns selected features to the current view. This function is used to create graphics for export. The view can be changed via Mouse or View functions and then assigned the features selected via this icon.
Tip: If multiple features have been selected and this function is activated then they are assigned to the current screen view. This enables the assignment of all the relevant features of a view to the same drawing section.
Display drawing area
![]() The current view is switched to the assigned drawing area. If saved, this assigned drawing area also be exported. The changes to the view can be saved via Assign to drawing area.
The current view is switched to the assigned drawing area. If saved, this assigned drawing area also be exported. The changes to the view can be saved via Assign to drawing area.
Renumbering stamps according to click sequence
![]() This function renumbers stamps in the drawing area according to the mouse click sequence.
This function renumbers stamps in the drawing area according to the mouse click sequence.
To activate this function use the following sequence of steps:
- Enter the basic value for the new numbers in the “Start value for the next stamp number” in the entry field at the bottom of the Feature table.
Example: '0” has been entered in this field and the next stamp will be numbered a “1”. Entering “101” in this field would result in the stamp numbers starting at “101”. - Click the icon to activate this function. The Feature table is hidden and the mouse changes its appearance:

- Left-click on stamps in the sequence in which you want to assign numbers. Pressing Esc or activating a new function exits the renumbering function.
Renumbering stamps in clockwise sequence
![]() This function renumbers the selected stamps in a clockwise sequence. Stamps need to be selected before using this function. Area selection is useful selection function.
This function renumbers the selected stamps in a clockwise sequence. Stamps need to be selected before using this function. Area selection is useful selection function.
To activate this function use the following sequence of steps:
- Enter the basic value for the new numbers in the “Start value for the next stamp number” in the entry field at the bottom of the Feature table.
Example: '0” has been entered in this field and the next stamp will be numbered a “1”. Entering “101” in this field would result in the stamp numbers starting at “101”. - Click the icon to activate this function. The Feature table is hidden and the mouse changes its appearance:

- Left-click the mouse cursor in the middle of the selected feature. The search starts at 10.30 (135°) and runs in a clockwise direction around the mid-point. With the same angles, the longer vector takes precedence (sort from inside outwards). The Feature table reappears on the screen when renumbering is complete.
Renumbering stamps according to their position
![]() This function is used to renumber stamps according to their position on the drawing. Stamps need to be selected before using this function. Area selection is useful selection function.
This function is used to renumber stamps according to their position on the drawing. Stamps need to be selected before using this function. Area selection is useful selection function.
To activate this function use the following sequence of steps:
- Enter the basic value for the new numbers in the “Start value for the next stamp number” in the entry field at the bottom of the Feature table.
Example: '0” has been entered in this field and the next stamp will be numbered a “1”. Entering “101” in this field would result in the stamp numbers starting at “101”. - Activating this function renumbers the stamps. The search starts top left, from above down, left to right.
Renumber selected stamps
![]() This function is used to renumber stamps according to their position in the Feature table. Stamps in the table need to be selected before using this function.
This function is used to renumber stamps according to their position in the Feature table. Stamps in the table need to be selected before using this function.
To activate this function use the following sequence of steps:
- Enter the basic value for the new numbers in the “Start value for the next stamp number” in the entry field at the bottom of the Feature table.
Example: '0” has been entered in this field and the next stamp will be numbered a “1”. Entering “101” in this field would result in the stamp numbers starting at “101”. - Activating this function renumbers stamps according to their position in the Features table.
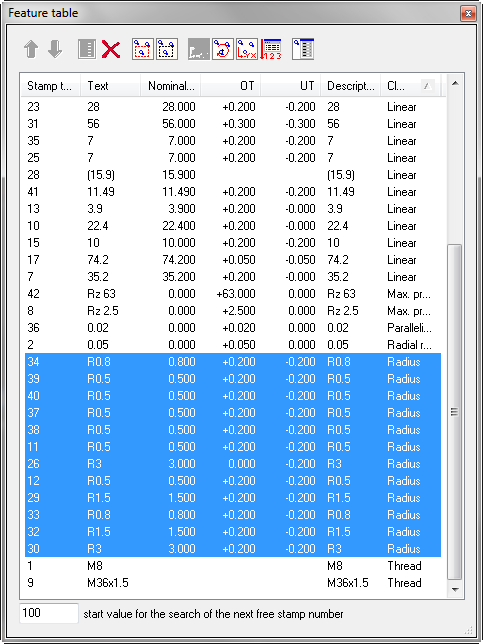
Example:
All features in radius Class are marked and entered as “100” start value:
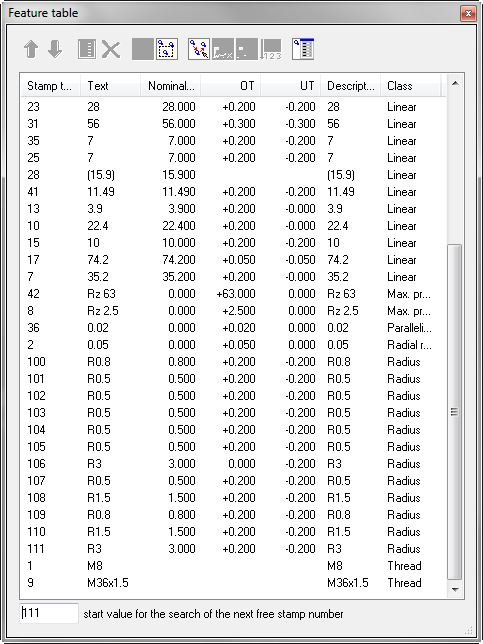
After activating this function all radii are assigned the new stamp number:
Create CAD-independent feature
![]() This function is used to create a feature independent of CAD. Use of this function is explained in detail under Function: Add feature.
This function is used to create a feature independent of CAD. Use of this function is explained in detail under Function: Add feature.